Custom bathymetry tilesets with MTS

We just launched a new bathymetry style and tileset to help transform ocean layers into detailed landscapes providing vital context for maritime navigation, marine sciences, and more.
Need to use a different bathymetry data source? Or adjust zoom levels or add data fields? Use the Mapbox Tiling Service (MTS) to process any bathymetry data (like NOAA’s global relief dataset or Blue Earth Bathymetry’s seafloor mapping) into custom tilesets.
"What may look like a large and featureless ocean suddenly comes alive with bathymetry, revealing the incredible geography of over 70 percent of our planet."
Anthony Goddard, Zero Six Zero
MTS allows the processing of massive sets of data into custom vector tilesets, continuously updating the maps as the data changes. MTS is available to all Mapbox developers as a service for uploading source data with transformation rules called ‘recipes.’
Tilesets generated using MTS can then be styled in Studio and composited with any other vector tilesets. MTS creates and updates data using an auto-scaling, distributed, and parallelized processing infrastructure, meaning data is processed much more quickly than is possible with a single server setup. These tilesets are private by default but can also be made public.
Create custom bathymetry tilesets with MTS
1. Select and prepare the data
Depending on the bathymetry data source, map makers may need to transform the data into a single GeoJSON file first. For the Natural Earth 1:10mil dataset with depth values at 1,000 meter intervals, merge the shapefiles into a single shapefile using this script or via QGIS. Then use ogr2ogr to transform the newly generated shapefile into GeoJSON.
ogr2ogr -f GeoJSON ~/new_file_name.geojson ./final/merge.shp
Find more tips about preparing and styling Natural Earth bathymetry data in Jan Žák’s how-to blog post.
2. Create the tileset with MTS
Upload the GeoJSON into a Mapbox tileset using MTS.
MTS uses ‘recipes’: JSON documents composed of configuration options that tell MTS how to process data into vector tiles. Recipes provide options for generating vector tiles such as degree of simplification, zoom level extent, geometry unioning, attribute manipulation, and more.
When unsure about how to optimize a tileset, start with zoom extent 0-5 and a generic recipe like this:
{
  "version": 1,
  "layers": {
    "water-detail": {
      "source": "mapbox://tileset-source/username/water-detail",
      "minzoom": 0,
      "maxzoom": 5
    }
  }
}
One option to create a tileset with MTS is to use the tilesets-cli, using this sample recipe with three short commands:
- Upload source data: tilesets upload-source username water-detail
- Create the tileset: tilesets create username.bathymetry --recipe ~/file/recipe.json --name "bathymetry"
- Publish the tileset: tilesets publish username.bathymetry
Once the tileset is created, use the Tileset explorer in Mapbox Studio to see an overview of the tileset content and properties, including layers, properties associated with each layer, tile size stats per zoom and per layer and the bounds of the data.
3. Optimize the tileset with recipe configurations
Exploring a tileset can reveal ways to improve it, such as removing unnecessary properties or cleaning up fragmented polygons.
A MTS recipe allows developers to manipulate the source data to optimize the output tileset for performance and styling purposes. Map Designer Clare Trainor used the following recipe configurations to generate an optimized bathymetry tileset that has contiguous and unioned polygons, reduced tilesize, and smooth and simplified borders:
{
  "version": 1,
  "layers": {
    "water-detail": {
      "source": "mapbox://tileset-source/username/water-detail",
      "minzoom": 0,
      "maxzoom": 8,
      "features": {
        "attributes": {
          "allowed_output": ["depth"]
        },
        "simplification": {
          "outward_only": true,
          "distance": 1
        }
      },
      "tiles": {
        "order": "depth",
        "union": [
          {
            "group_by": ["depth"],
            "simplification": {
              "distance": 4,
              "outward_only": false
            }
          }
        ]
      }
    }
  }
}
Per feature, the recipe simplifies the water polygons and removes unnecessary features. Per tile, the recipe unions and simplifies the output polygons again. To explore these recipe configuration options, check out the MTS documentation.
With new configurations identified, add them to the recipe and republish the tileset:
- Update the recipe: tilesets update-recipe username.bathymetry ~/path/recipe.json
- Create the tileset: tilesets publish username.bathymetry
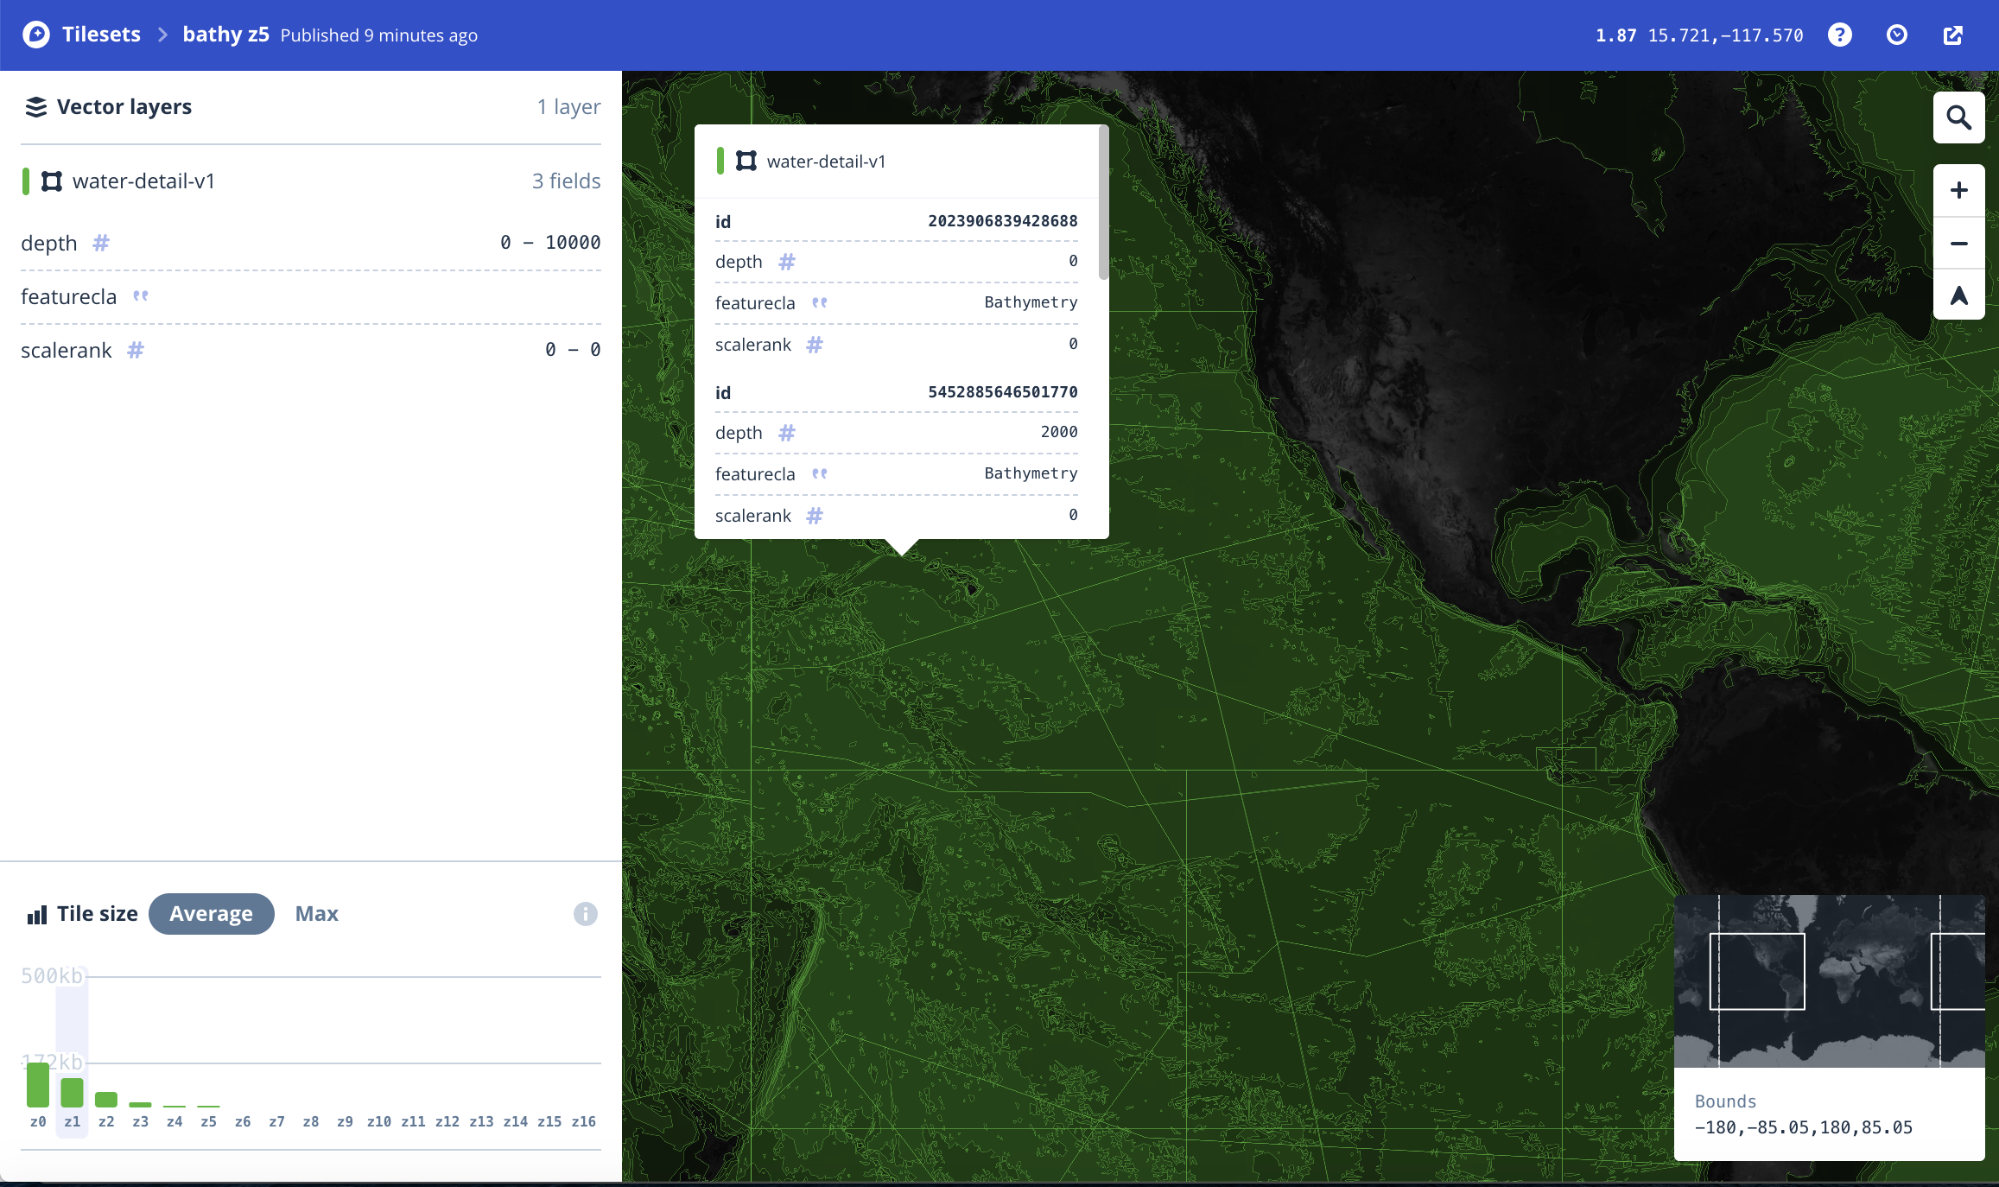
4. Explore the final tileset
Now in the Tilesets explorer, view the updated tileset in ‘x-ray’ mode. Click on an area of ocean to reveal details about the layered polygons.
On the left side of the screen, the Vector Layers section highlights that properties have been removed in the water-details layer. Tile Size visualizes the tile size reduction. In the map view, the water polygons are large and contiguous as opposed to fragmented into many small polygons in the previous version.
The ocean awaits! Explore the MTS documentation and get started building a map with custom data today.


.png)

Related articles
Build once, run everywhere: Web support comes to the Mapbox Maps SDK for Flutter
From airports to stadiums, maps are elevating the soccer fan experience