Building Cinematic Route Animations with MapboxGL
How we create Animated Route Tracking Scenes and Video Exports
You may have seen Mapbox tweets and instagram posts featuring animated videos showing each stage of the Tour de France. With graceful camera movements, satellite imagery, and 3D terrain, we can immerse the viewer and give a good impression of the elevation changes and distances that the cyclists on the tour must endure.
In this post we’ll review all of the moving parts involved in creating these animated videos:
- Zoom in to the route area from high altitude
- Animating the route on the map
- Following the leading edge of the animated route with the camera
- Smoothing/slowly rotating the camera to create a more visually appealing scene
- Exporting from web canvas to video
The approach for these videos begins with the Query Terrain Elevation example from the Mapbox GL JS docs, which shows similar route-tracking on 3D terrain, but without the precise camera control.
Revealing the Route
Starting with the route encoded as a geoJSON LineString, we must reveal the length of the line incrementally to animate “progress” over time.
Animation is a series of still images played together, so the task at hand is to programmatically build each frame with the necessary changes as compared to the previous frame. For this, we use the browser’s window.requestAnimationFrame() method, which also helps us keep track of time.
To reveal the line over time, we modify a paint property called line-gradient.
First we calculate the value of the animationPhase by dividing the amount of time that has passed since the animation started, and dividing by the preset duration of the animation. This yields a value between zero and one for each frame as we move from start to finish.
We then apply this with setPaintProperty():
const animationPhase = (currentTime - startTime) / duration;
...

map.setPaintProperty(
    "line",
    "line-gradient",
    [
        "step",
        ["line-progress"],
        "yellow",
        animationPhase,
        "rgba(0, 0, 0, 0)"
    ]
);
In plain english, this expression is saying “Color each point along the line yellow if it falls before the current point of progress, and color it transparent if it falls after it.” Because animationPhase trends closer to 1 with each frame, every time this setPaintProperty() method is called we reveal another small chunk of the line.
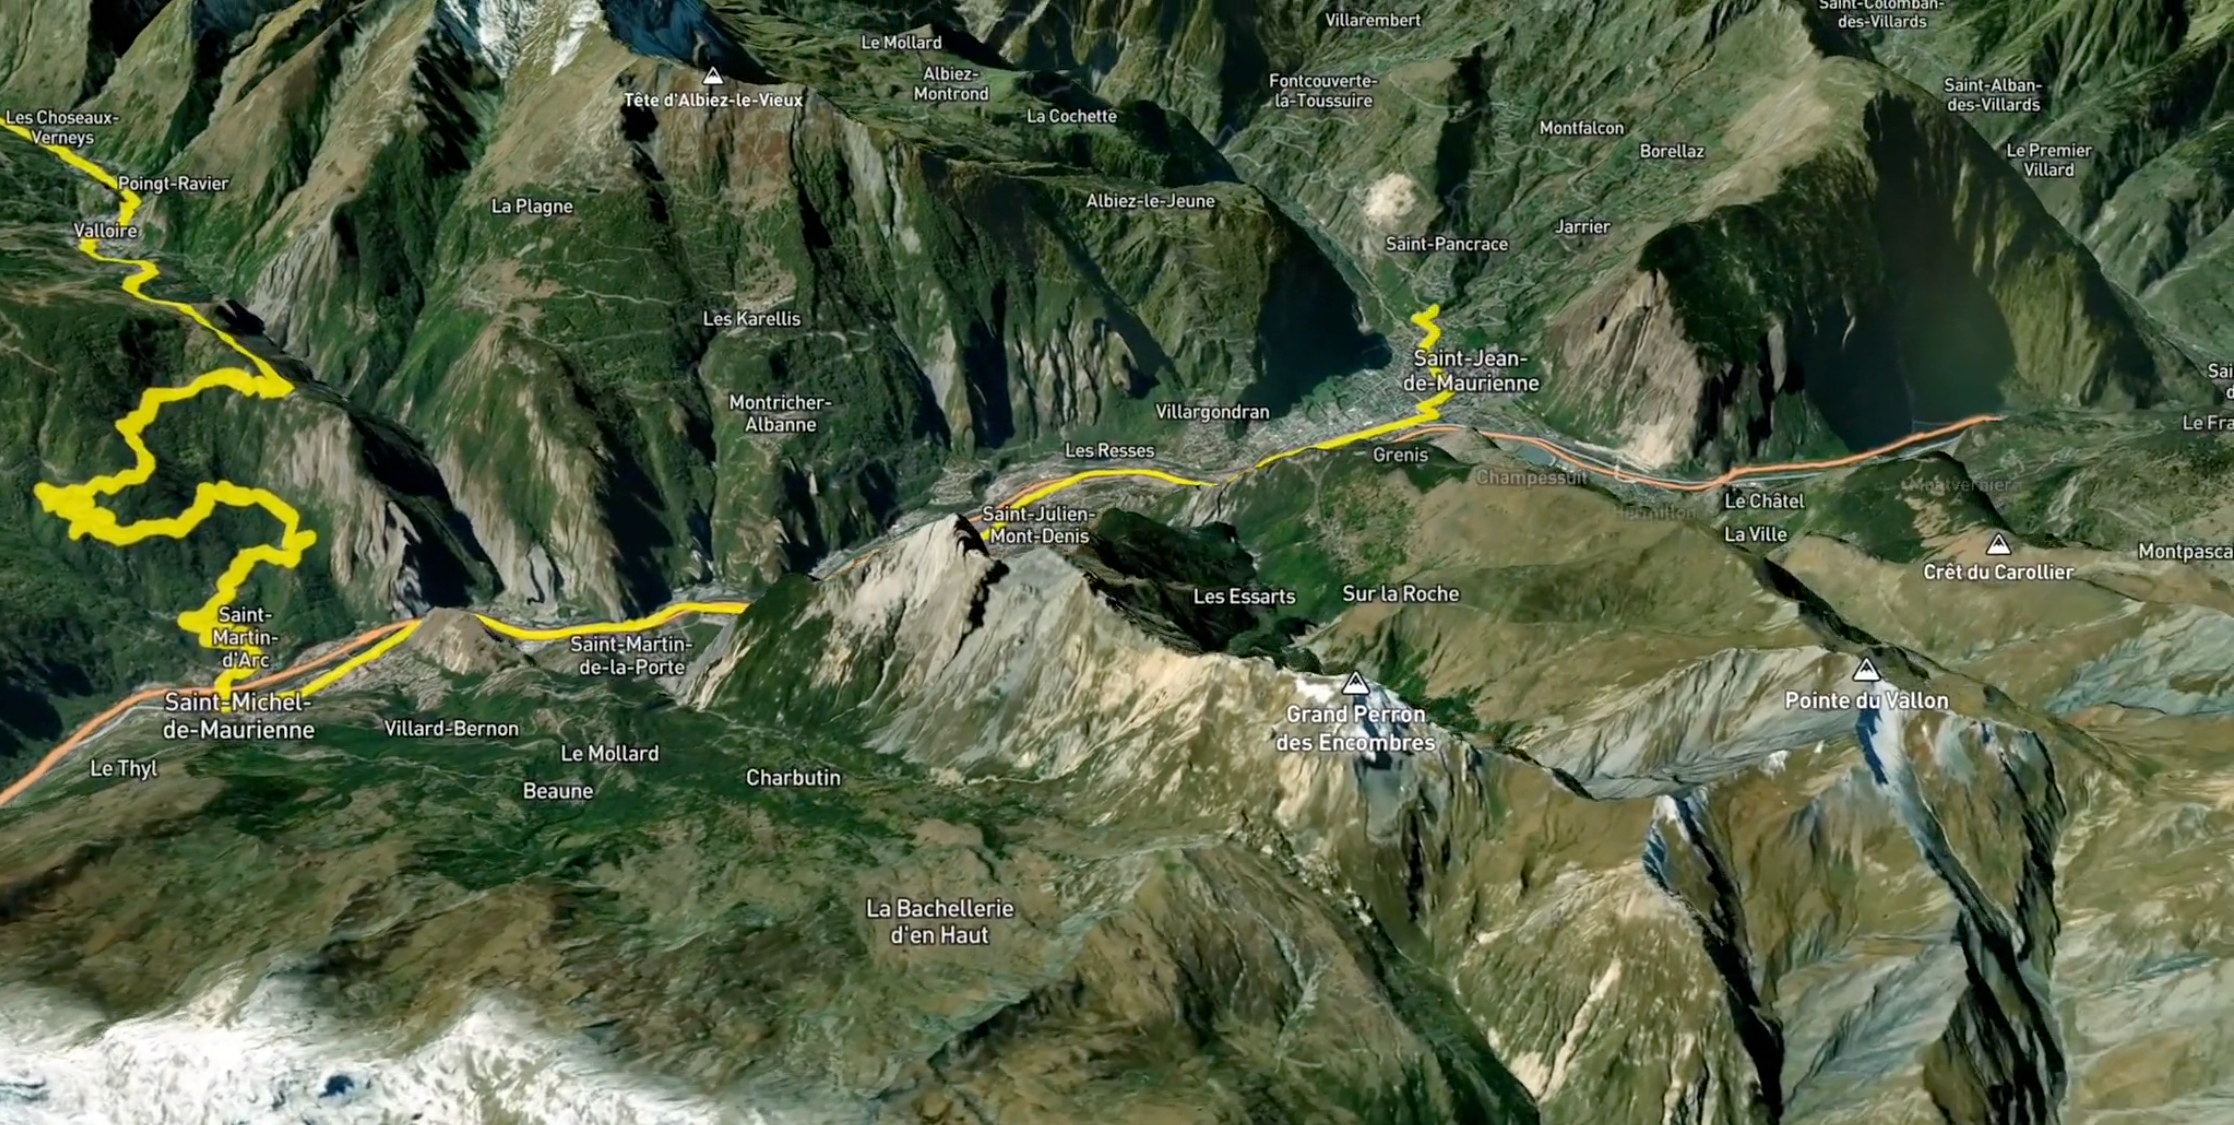
Here's an example showing this technique to reveal a simple two-point LineString over 3 seconds:
Moving the Camera to Follow Along
The line is now revealing itself with each frame, so how do we make the camera follow along? The answer requires turf.js and a bit of trigonometry along with Mapbox GL JS' FreeCamera API. First, we need to grab the coordinates of the “leading edge” of the line. turf.distance() and turf.along() are used with animationFrame to pick the correct point along the length of the line.
// Before the animation, calculate the length of the line
const pathDistance = turf.lineDistance(path);
...
// Calculate the distance along the path based on the animationPhase
const [lng, lat] = turf.along(path, pathDistance * animationPhase)
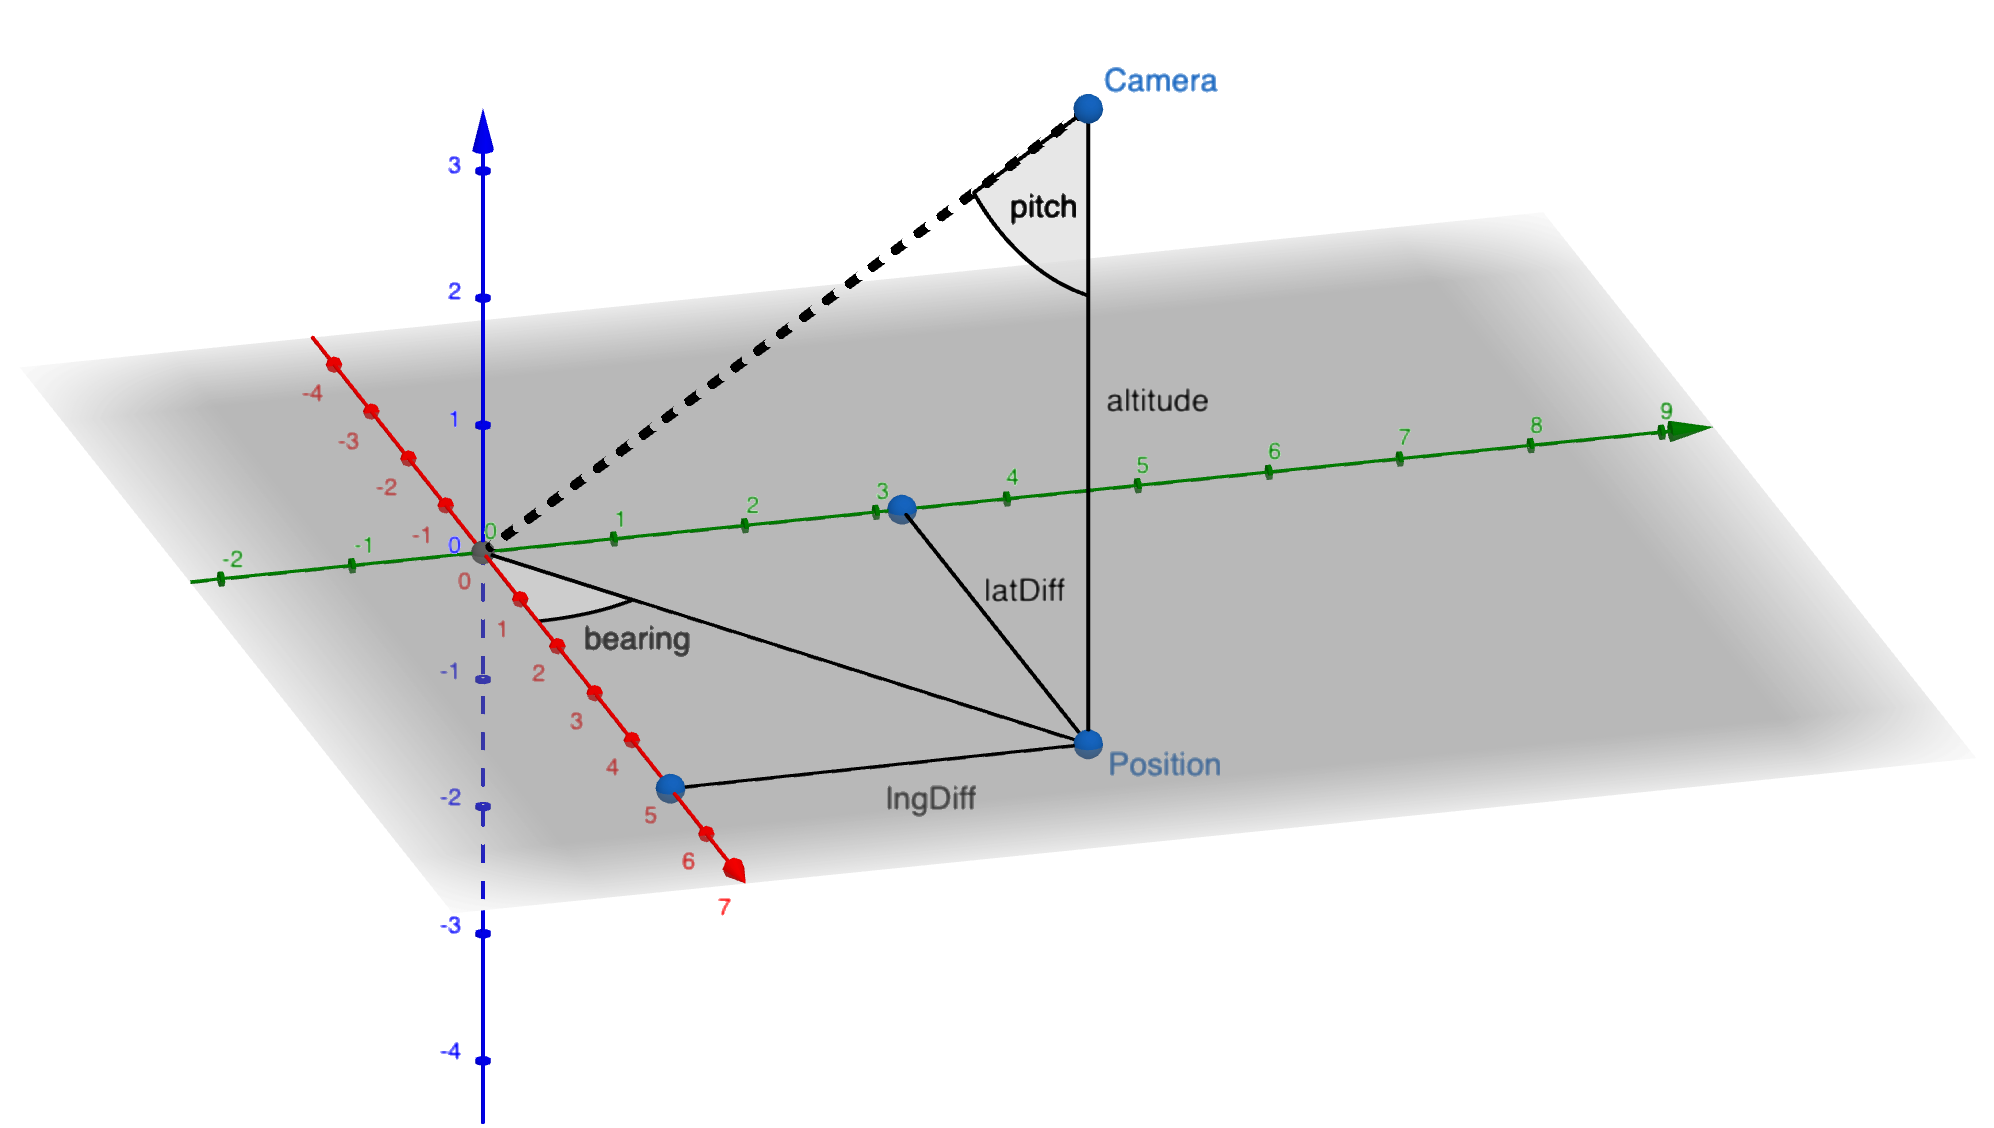
.geometry.coordinates;To control the camera, we must provide four things: position/altitude (where is it?), and pitch/bearing (which way is it pointing?). The altitude and pitch are constant in these videos, which leaves only bearing and camera position to be calculated.
The bearing of the camera is unrelated to progress along the path; we are changing it at a constant rate for a subtle cinematic rotation effect.
const bearing = startBearing - animationPhase * 200.0;With a bearing, altitude, pitch, and the point we want to look at, we can use trigonometry to infer the camera position:
const computeCameraPosition = (
    pitch,
    bearing,
    targetPosition,
    altitude,
    smooth = false
) => {
    const bearingInRadian = bearing / 57.29;
    const pitchInRadian = (90 - pitch) / 57.29;

    const lngDiff =
        ((altitude / Math.tan(pitchInRadian)) *
            Math.sin(-bearingInRadian)) /
        70000; // ~70km/degree longitude

    const latDiff =
        ((altitude / Math.tan(pitchInRadian)) *
            Math.cos(-bearingInRadian)) /
        110000; // 110km/degree latitude

    const correctedLng = targetPosition.lng + lngDiff;
    const correctedLat = targetPosition.lat - latDiff;

    const newCameraPosition = {
        lng: correctedLng,
        lat: correctedLat
    };

    ...

    return newCameraPosition;
};
Note: Conversion of degrees of longitude to meters is latitude-dependent. The function above uses a fixed conversion of 70km per degree, which is accurate enough for France, but will not work everywhere.
Here’s a visual to help describe the calculation happening in computeCameraPosition(). We know the spot on the ground we want to look at along with the altitude and bearing, and pitch. The new position of the camera is calculated relative to the target position as an x offset and a y offset.
Smoothing Things Out with LERP
In earlier iterations of the videos, the camera directly follow the path which may include sharp turns. Since the camera is laser-focused on the leading edge of the line, the results in shakiness in the animation.
Linear interpolation, also known as “lerp”, can be used to smooth the camera movement by preventing it from moving too abruptly between frames.
// from https://codepen.io/ma77os/pen/OJPVrP
function lerp(start, end, amt) {
    return (1 - amt) * start + amt * end;
}
This codepen by André Mattos demonstrates a lerp function to smooth the movement of the circle. Move the mouse, and see how the circle smoothly follows the pointer. We used the same lerp function to add smoothing to our route animations.
We pass the previous position and new leading edge through a lerp function, and get a new position that is "smoother". This means the leading edge we want to look at may not be in the absolute center of the frame, but it will trend back towards the center over time as long as the movements aren’t too sudden.
Zoom in from the globe
Each video starts with a fly-in from high election to include what part of the world we'll see in the route animation. While Mapbox GL JS has a convenient flyTo() method, we couldn't use it here because it was difficult to seamlessly transition between the end state of the flyTo() and the beginning of our FreeCamera API controls. Instead, we wrote a custom function to transition the camera between the initial globe view and the starting view of the track animation.
Exporting the Canvas to Video
To export videos, we use a technique described in this example in the Mapbox GL JS codebase. It makes use of the mp4-encoder javascript library, and uses each render of the Mapbox GL JS canvas to save a frame.
function frame() {
    // increment stub time by 16.6ms (60 fps)
    now += 1000 / 60;

    mapboxgl.setNow(now);

    const pixels = encoder.memory().subarray(ptr); // get a view into encoder memory

    gl.readPixels(0, 0, width, height, gl.RGBA, gl.UNSIGNED_BYTE, pixels); // read pixels into encoder

    encoder.encodeRGBPointer(); // encode the frame
}

map.on("render", frame); // set up frame-by-frame recording
The size of the canvas is controlled via CSS on the map container. For 16:9 videos we use a container with dimensions 1280px x 720px. For the square videos (used on Instagram), the dimensions are 1080px x 1080px.
Post-production
Once the animation is complete, those frames are assembled and downloaded as an mp4. Finally, the output mp4 is compressed using the CLI tool ffmpeg.
ffmpeg -i my_video.mp4 my_video_compressed.mp4From there, members of our web design team add intro and outro graphics, and pass the finished product along to our social media team for publishing.
The code used to create these animations is published to our impact tools repository on github for your reference and re-use. We would love to hear about your experiences tinkering with the FreeCamera API and exporting high-quality videos from your Mapbox GL JS projects, so be sure to tag @mapbox on twitter as soon as you're ready to share.


Related articles
Tour Osaka in 3D with Mapbox Standard

One Attribute to Rule Them All