Troubleshoot raster image with black background
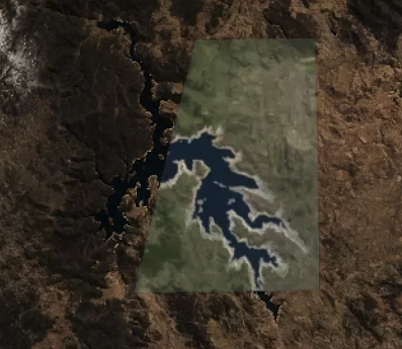
Sometimes raster image uploads appear with a black background where you would expect there to be transparency. These black pixels often exist around the edges of the image as shown below.

Drought Shrinks Australia's Lake Eucumbene. NASA Visible Earth. May 2007. www.earthobservatory.nasa.gov/
Why black backgrounds appear
The black background that appears is the part of the raster image that does not contain any data. Generally a raster image is a rectangular grid of pixels. When you are working with data that is not rectangular, there are pixels within the grid that don't contain any data. These pixels are expressed as NoData values and represent the absence of data. GeoTIFFs that are uploaded to Mapbox Studio are displayed as JPEG to save space and make maps load quickly. Since JPEG cannot display transparency, NoData values appear black.
It's not possible to change the appearance of NoData values within Mapbox Studio, but there are two strategies you can use to resolve the issue outside of Mapbox Studio. First, you can use Mapbox GL JS to retrieve a PNG instead of a JPEG. If that doesn't work, you can edit the original image using Rasterio.
You may see a black background when you use some browsers or older browser versions, but not see the black background using newer browser versions. This is because many modern browsers support the WebP image format. (For a full list of web browsers that natively support WebP, see the official WebP documentation.) Mapbox services will use this more efficient format if browser support is detected at runtime.
Change the way you retrieve the image
When you use your style in a Mapbox GL JS application, you can dynamically add the tiles to the style as a raster source and specify that it be encoded as PNG instead of JPEG. Since the PNG format supports transparency, if your GeoTIFF was exported with the correct NoData values they should appear transparent. Once you have initialized your map, add the following code to add the raster source to your map:
map.on('load', () => {
  map.addLayer({
    id: 'raster-layer',
    type: 'raster',
    source: {
      type: 'raster',
      tiles: [
        'https://api.mapbox.com/v4/{tileset_id}/{z}/{x}/{y}.png?access_token= <UserAccessToken /> '
      ]
    },
    minzoom: 0,
    maxzoom: 22
  });
});
After adding the above code, view your map in the browser and check if those changes resolved the transparency issue. If you are still seeing the black background, make sure that your GeoTIFF was initially exported with the correct NoData values by following the process outlined below.
Use this work-around with Mapbox GL JS v1.8.0 or higher to make sure that all requests sent to Mapbox servers include a SKU token.
Edit the original image
You can edit the original GeoTIFF using a tool called Rasterio. Rasterio is used to read and write raster datasets. First, run the following command, and compress the image using a lossless data compression method called LZW:
rio calc "(asarray (take a 1) (take a 2) (take a 3))" --co compress=lzw --co tiled=true --co blockxsize=256 --co blockysize=256 --name a=filename.tif filename255.tif
Next, run this command to set NoData values to zero:
rio edit-info --nodata 0 filename255.tif
For more information on Rasterio, read the Rasterio documentation on GitHub
Once you do this, upload your new filename255.tif file. See the image below for an example of the expected result.
Render raster tiles on mobile
After you have used Rasterio to make the tile transparent, as described above, and have uploaded it to Mapbox Studio, you will reference it in your mobile project:
iOS
The transparent tile needs to be referenced as an RasterSource object in your iOS app:
// Specify a unique string as the source ID (SOURCE_ID)
let sourceId = "SOURCE_ID"
// This URL points to raster tiles designed by Stamen Design.
let sourceUrl = "https://api.mapbox.com/v4/{tileset_id}/{z}/{x}/{y}.png?access_token= <UserAccessToken /> "
// Create a RasterSource and set the source's "tiles"
// to the Stamen watercolor raster tiles.
var rasterSource = RasterSource()
rasterSource.tiles = [sourceUrl]
// Specify the tile size for the `RasterSource`.
rasterSource.tileSize = 256
// Add the raster source to the style
try! mapView.mapboxMap.style.addSource(rasterSource, id: sourceId)
Android
The transparent tile needs to be referenced as a RasterSource object in your Android app:
style {
  // Specify a unique string as the source ID (SOURCE_ID)
  +rasterSource("SOURCE_ID") {
    tileSize(256)
    tiles(listOf("https://api.mapbox.com/v4/{tileset_id}/{z}/{x}/{y}.png?access_token= <UserAccessToken /> ")) {}
  }
}
Contact Mapbox support
If you continue to see a black background after following the above steps, contact support and attach your original GeoTIFF for further troubleshooting.